Greetings, dear reader!
I have been running ALL WEEKEND with friends new and old, creating and crafting for missions! Here are some of the projects I made as demos and make-n-takes...not being a "real" scrapbooker, it was a bit of a stretch for me to create some things that used ONLY scrapbooking materials. So nothing earth shattering, but here they are, nonetheless:
This card was a favorite...and was super easy! My friend Carla is a
Creative Memories consultant, so everything was made with those products...this 3D tree was made with a simple circle punch. 20 circles, folded in half, then taped and staggered to form the look of a tree. A piece of brown paper, a golden star punch, and a ribbon to give the look of a gift wrapped present.

This gift tag was created by using the tag punch (making two and putting them end to end) and then using the scallop punch. 4 scallops, cut to a point at the top. The bottom scallop and brown paper trunk is taped down, and the other 3 layers are given dimension by using pop dots. An epoxy owl to sit at the top of the tree and a little gift at the bottom. A little red ribbon and voila! An adorable gift tag for your packages.
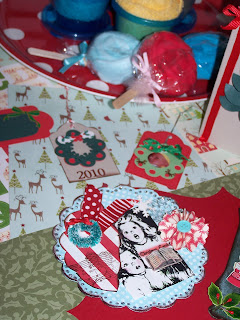
3 more quick and easy tags: the to/from made with two of the tag punches. Each of the other two tags with wreaths were again made with the scallop punch...a unique design and slide tab allow the punch to make both scalloped circles:
You simply cut a plain scallop out of red cardstock, and then a scallop with holes from green cardstock. This makes "instant berries" on the wreath! A tiny 5 petaled flower punched from green cardstock is glued around the center of the wreath to give it a more "foliaged" look. A heart cut in half makes the bow, and (in a moment of either sleep deprivation or great inspiration,) I saw the micro punch that included what I THOUGHT was a reindeer. Behold the punch:
Okay, see the frog in the upper right hand corner? I was looking at the punch upside down and thought I saw a reindeer. Do YOU see a reindeer? Here's a close up of the finished product:
I used the dots that were punched from the scallop with holes. My little granddaughter Morgan is the "star" of the tag that will double as an ornament.
FINALLY, I got these treasures at the Nashville flea market a few weeks ago. I thought the idea was SO SWEET...
Super soft baby washcloths, folded and topped with a "cherry" button. Also, washcloths folded and wrapped like lollipops. These were displayed sticking out of the top of a gift bag with styrofoam inside. SOoooo adorable!
Add a gift of homemade bath salts, and it would be a wonderfully pampering gift for Christmas! Here's a recipe I've used for bath salts and a brown sugar scrub from
Sweet Tidings. And the
chocolate version is heavenly! LOVE! The peppermint washcloths, peppermint bath salts, and a chocolate sugar scrub! Is anybody else drooling?!
Here's my recipe for Peppermint Candy Cane Bath Salts:
For each cup of bath salts you will need:
- 1 cup of Epsom Salts
 (or 3/4 cup epsom salts mixed with 1/4 cup of sea salt)
- 4 drops of Peppermint Essential Oil

- 2 drops red food coloring
- optional: 4 drops Glycerin

- mixing equipment: two bowls, mixing spoons, funnel, glass jar
Divide the epsom salts into two bowls. Add two drops of peppermint oil and two drops of glycerin, if using, into each bowl. Add two drops of red food coloring to one bowl and stir to evenly distribute the color.
Begin alternating layers of red and white bath salts in a clear glass jar, using a funnel. Make sure the jar is filled completely to the top to prevent colored from shifting before use.
Easy peasy!
More crafts and ideas soon! Hugs!
Paula Clare


